

Introduction
The integration of Google Sheets with the Twilio API for WhatsApp provides a powerful tool for automating message delivery. This combination allows for the creation of dynamic, responsive messaging systems that can automatically send updates, notifications, or alerts via WhatsApp based on data changes in a Google Sheets document.
Google Sheets serves as a flexible and user-friendly platform for data management. It can be used to store contact information, message content, timestamps for scheduled messages, and more. Any changes or additions to this data can be used as a trigger for sending a WhatsApp message.
Twilio, on the other hand, is a cloud communications platform that provides APIs for various communication channels, including WhatsApp. The Twilio API for WhatsApp allows you to programmatically send WhatsApp messages using a few lines of code.
By integrating Google Sheets with the Twilio API, you can automate the process of sending WhatsApp messages based on your data. For instance, if you have a list of clients in your Google Sheets document and you update the status of their orders, this system can automatically send them a WhatsApp message notifying them about the status change.
This integration can be achieved through direct API integration using custom code or by using third-party automation platforms like Zapier. Regardless of the method used, this integration opens up possibilities for efficient and automated communication workflows.
Overview
There are two primary methods for integrating the Twilio API with Google Sheets:
Direct API Integration: This method involves writing custom code to connect the two systems. It offers the most flexibility but requires technical expertise.
Third-Party Platforms: Several third-party platforms provide easy integration of Twilio API with Google Sheets. These platforms often offer a user-friendly interface and pre-built templates, making them suitable for users without coding experience.
Prerequisites
Before starting, ensure you have the following:
Node.js installed on your computer.
A basic understanding of Node.js and JavaScript.
A code editor (e.g., Visual Studio Code).
Access to Google Cloud Console.
Step-by-Step Guide
Direct API Integration
To integrate the Twilio API with Google Sheets using direct API integration, follow these steps:
Google Cloud Console Setup: Create a new project in the Google Cloud Console. Enable the Google Sheets API for this project and create credentials (a service account key). Download the resulting JSON file (
privatekey.json), which contains yourclient_emailandprivate_key.Google Sheets Setup: Share your Google Sheets document with the
client_emailfrom your service account key. Ensure the sharing settings allow this email to view or edit the document as necessary.Twilio Setup: Create a new Twilio account and note down your Account SID and Auth Token. Set up a WhatsApp sandbox in your Twilio account and note down your sandbox number.
Secrets File: Create a
credentials.jsonfile that contains your Twilio Account SID, Auth Token, sandbox number, and the ID of your Google Sheets document.Node.js Application: Set up a Node.js application with the necessary packages (
googleapisandtwilio). Use your provided code to read the last updated row from your Google Sheets document and send a WhatsApp message if there’s an update.Running Your Application: Run your Node.js application. Your application will automatically send a WhatsApp message to the specified recipient whenever there’s an update to your Google Sheets document.
1.Get Access Credentials for Google Sheets API
To use the Google Sheets API, you need to have a Google account and access credentials for the API. These credentials are a client ID and secret that allow you to access the drive storage where your Google Sheets document is stored. Here is how you can get these credentials:
Go to the [Google Cloud Console] and create a new project or select an existing one.
In your project, go to APIs and services and click on ENABLE APIS AND SERVICES.
In the search box, search for
google sheets APIthen enable it for the project created.After enabling the API, click on CREATE CREDENTIALS and select Application data.
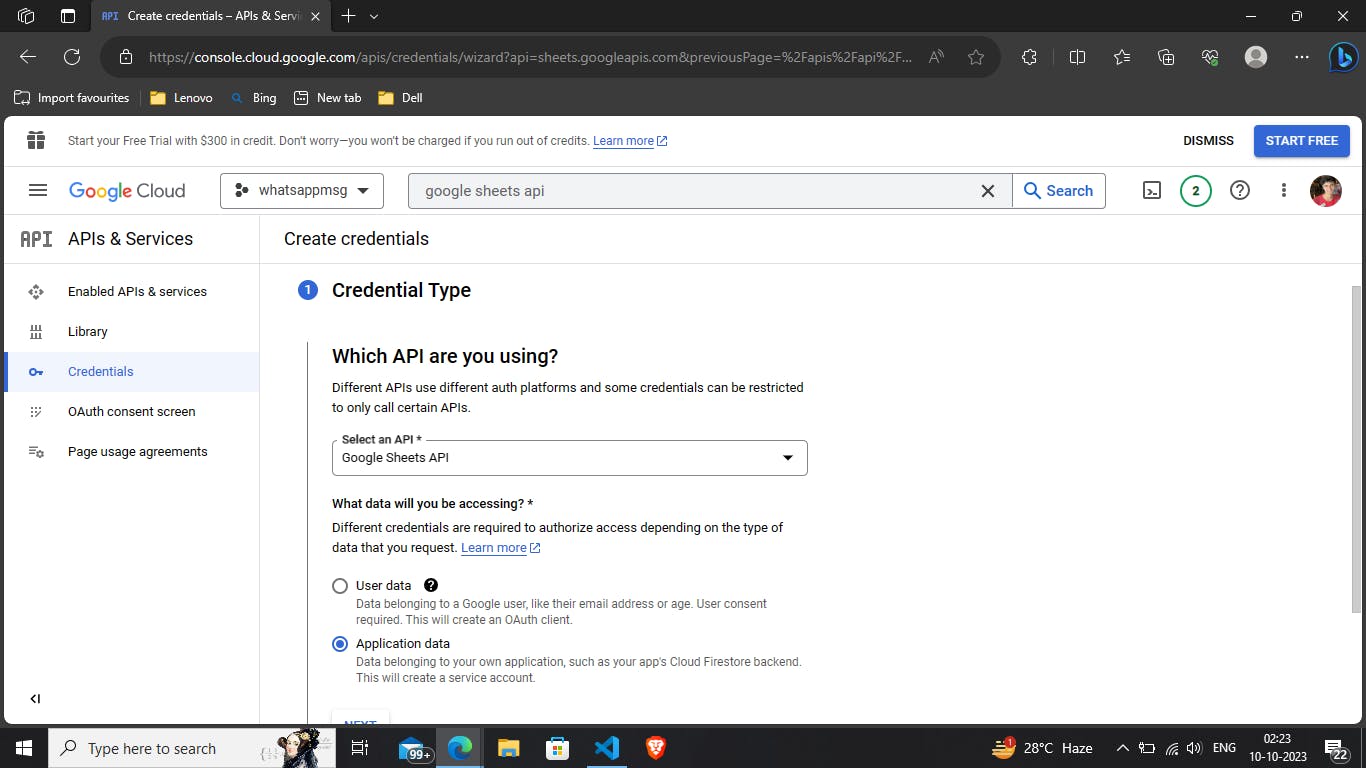
Fill in the Service account details and click CREATE. The next two steps are optional; just click CONTINUE and then DONE.
Copy the email address that is generated for your service account and save it somewhere. This is your
client_email. Click on the email address to go to the next screen.Go to Credentials in left menu and click on the email in service accounts Under keys, click on Add key and choose JSON as the key type. Click Create. This will download a JSON file that contains your private key.
Move the downloaded JSON file to your project folder and rename it as
privatekey.json. Keep this file safe and don't make it public.
You have now obtained your access credentials for Google Sheets API.
The file should look like the one below:
{
  "type": "service_account",
  "project_id": "YOUR PROJECT ID",
  "private_key_id": "YOUR PRIVATE KEY ID",
  "private_key": "YOUR PRIVATE KEY ",
  "client_email": "YOUR CLIENT EMAIL",
  "client_id": "YOUR CLIENT ID",
  "auth_uri": "YOUR AUTH URI",
  "token_uri": "YOUR TOKEN URI",
  "auth_provider_x509_cert_url": "https://www.googleapis.com/oauth2/v1/certs",
  "client_x509_cert_url": "https://www.googleapis.com/..."
}
2.Google Sheets File Creation and Setup
Create a Google Sheets file: In your Google Drive, create a new Google Sheets file.
Share the file: Share this file with the
client_emailfrom your service account key. Make sure to set the role of this email to “Editor” so that it can read, edit, and update the contents of the file.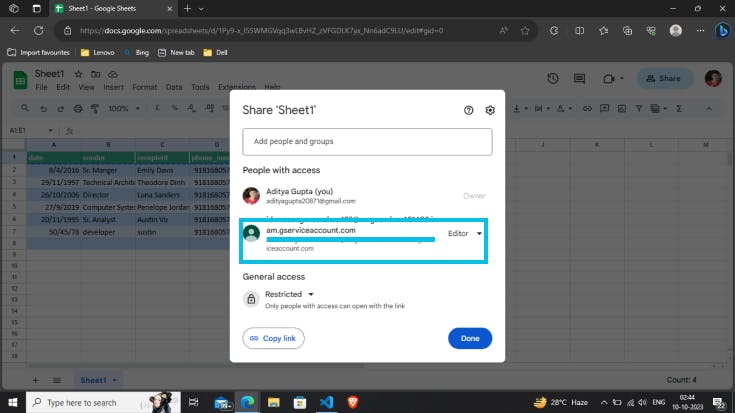
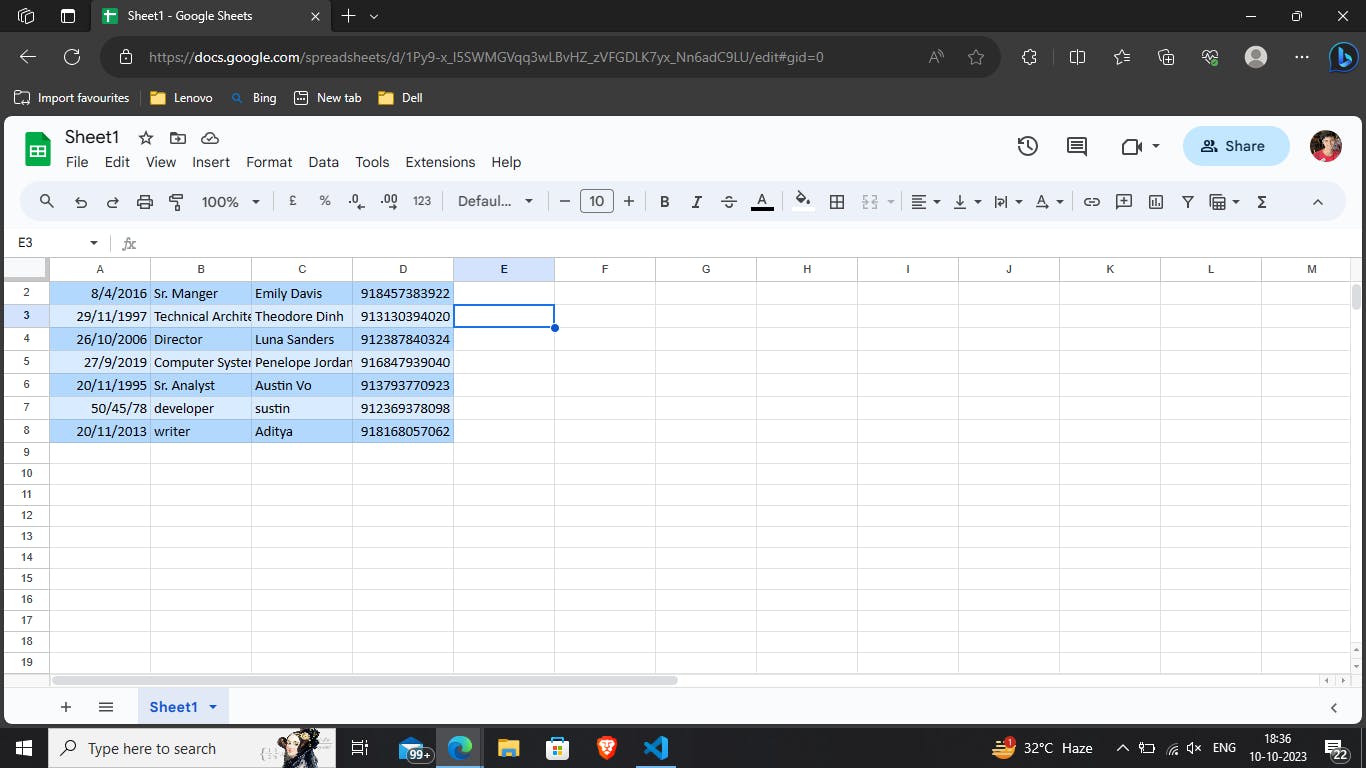
Populate the file: This Google Sheets file will be used to collect article suggestions and their authors. Populate it accordingly.
Create
secrets.json: Add the ID of your Google Sheets file to yoursecrets.jsonfile.The ID should be present in the URL of google sheets like this: https://docs.google.com/spreadsheets/d/{spreadsheet_id}/edit#gid=0 .The updatedsecrets.jsonfile should look like this:{ "spreadsheet_id": "REPLACE WITH SPREADSHEET ID" }Note: The spreadsheet ID is sensitive information and should not be shared publicly. Always keep this file safe.
3. Twilio Setup
Twilio Configuration
Twilio Account: Log into your Twilio Console. Make a note of your Twilio account’s “ACCOUNT SID” and “AUTH TOKEN”. These are required for sending messages.
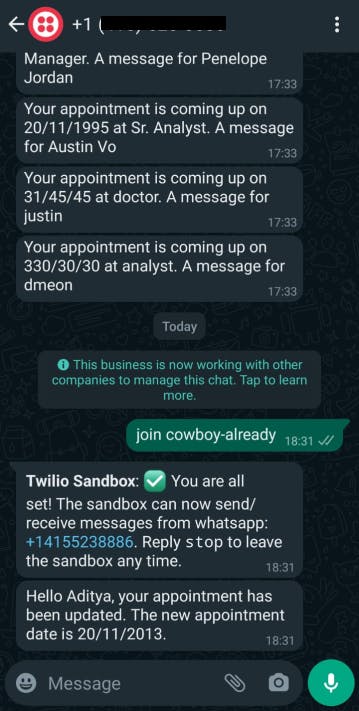
Activate WhatsApp Sandbox: Activate the Twilio Sandbox for WhatsApp. Note down the phone number you choose in the Sandbox as it will be used when sending messages. Connect your mobile using the QR code provided for connecting to WhatsApp sandbox. WhatsApp recipients need to opt-in by sending a “join [KEY-WORD]” WhatsApp message to this phone number.
Twilio’s API for WhatsApp: You can find more details about Twilio’s API for WhatsApp in the official documentation.
Update
secrets.json: Add your ACCOUNT SID, AUTH TOKEN, and WHATSAPP SANDBOX NUMBER to yoursecrets.jsonfile. The updatedsecrets.jsonfile should look like this :{ "account_sid": "REPLACE WITH ACCOUNT SID", "auth_token": "REPLACE WITH AUTH TOKEN", "sandbox_number": "REPLACE WITH WHATSAPP SANDBOX NUMBER" }4. Update Secrets File
Update
secrets.json: Add the ID of your Google Sheets file to yoursecrets.jsonfile.The ID of the google sheet should look somethig like this : https://docs.google.com/spreadsheets/d/{spreadsheet_id}/edit#gid=0 The updatedsecrets.jsonfile should look like this :{ "spreadsheet_id": "REPLACE WITH SPREADSHEET ID", "account_sid": "REPLACE WITH ACCOUNT SID", "auth_token": "REPLACE WITH AUTH TOKEN", "sandbox_number": "REPLACE WITH WHATSAPP SANDBOX NUMBER" }Note: The spreadsheet ID is sensitive information and should not be shared publicly. Always keep this file safe.
5.Setting Up a Node.js Application
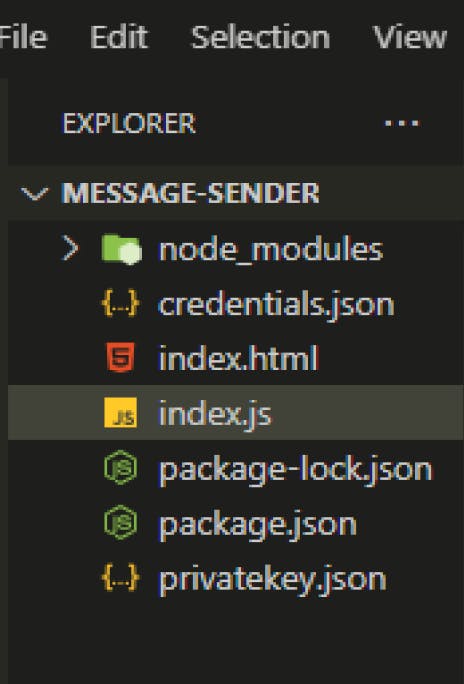
Step 1: File Structure :
Step 2: Create a Project Directory
First, create a new directory for your project. You can do this by executing the following commands in your terminal:
 mkdir message-sender
 cd message-sender
Step 3: Initialize a Node.js Application
Next, initialize a new Node.js application within the directory you just created. This will create a
package.jsonfile that keeps track of your project’s dependencies and scripts. Use the-yflag to automatically fill in the default information.npm init -yWith these steps, you have successfully set up a basic Node.js application in your
message-senderdirectory. Install the required packages for integrating Twilio API and Google Sheets :npm install googleapis twilio --saveStep 4: Create Your Application File
Create a new file named
index.jsin your project directory. This will be the main file of your Node.js application.Step 5: Add Your Code to index.js
Filename: index.js
 const { google } = require('googleapis');
 const { Twilio } = require('twilio');

 // configure a JWT auth client
 const privatekey = require("./privatekey.json");

 const authClient = new google.auth.JWT(
     privatekey.client_email,
     null,
     privatekey.private_key,
     ['https://www.googleapis.com/auth/spreadsheets.readonly']);

 // things we shouldn’t share with our code
 const credentials = require("./credentials.json");

 const sheets = google.sheets('v4');
 const twilio = new Twilio(credentials.account_sid, credentials.auth_token);

 // get the last updated row
 sheets.spreadsheets.values.get({
     spreadsheetId: credentials.spreadsheet_id,
     range: 'Sheet1',
     auth: authClient
 })
     .then(function (response) {
         const rows = response.data.values || [];
         if (rows.length) {
             const lastUpdatedRow = rows[rows.length - 1];

             // check if the last updated row has been updated
             if (lastUpdatedRow[0] !== lastUpdatedRow[4]) {
                 // send the message
                 twilio.messages
                     .create({
                         from: 'whatsapp:' + credentials.sandbox_number,
                         to: 'whatsapp:' + lastUpdatedRow[3],
                         body: `Hello ${lastUpdatedRow[2]}, your appointment has been updated. The new appointment date is ${lastUpdatedRow[0]}.`
                     })
                     .then(function (message) {
                         console.log(message.sid + '\n');
                     })
                     .catch(function (err) {
                         console.log(err);
                     });
             }
         }
     })
     .catch(function (err) {
         console.log(err);
     });
The code is a Node.js script that uses the Google Sheets API and the Twilio API to send WhatsApp messages when there’s an update in a Google Sheets document. Here’s a breakdown of what the code does:
Import Required Packages: The
googleapisandtwiliopackages are imported. These packages provide the functions necessary to interact with the Google Sheets API and the Twilio API, respectively.Configure JWT Auth Client: A JWT (JSON Web Token) auth client is configured using the
client_emailandprivate_keyfrom yourprivatekey.jsonfile. This client is authorized to read from your Google Sheets document.Import Credentials: Your Twilio credentials and Google Sheets ID are imported from
credentials.json.Initialize Google Sheets and Twilio Clients: The Google Sheets API and Twilio client are initialized.
Get Data from Google Sheets: The script gets data from a specific range in your Google Sheets document.
Check for Updates and Send Message: If there’s an update in the data (i.e., if the value in column A of the last updated row is different from the value in column E), a WhatsApp message is sent to the recipient specified in column D of this row. The message contains an update about an appointment date and time.
Now we have updated the Sheet1 and the last message looks like this:
To run this script, you need to have Node.js installed on your computer. Save this script in a file, say
index.js, in your project directory. Then, you can run it using the commandnode index.jsin your terminal.
Now you will receive the last updated WhatsApp message.
Third-Party Platforms:
There’s an easier way to automate the process of sending WhatsApp messages based on updates to a Google Sheets document without writing any code. You can use a third-party service like Zapier, which allows you to create automated workflows, called “Zaps”, between different apps.
Here’s how you can do it:
Create a Zap: Sign in to your Zapier account and click on the “Make a Zap” button.
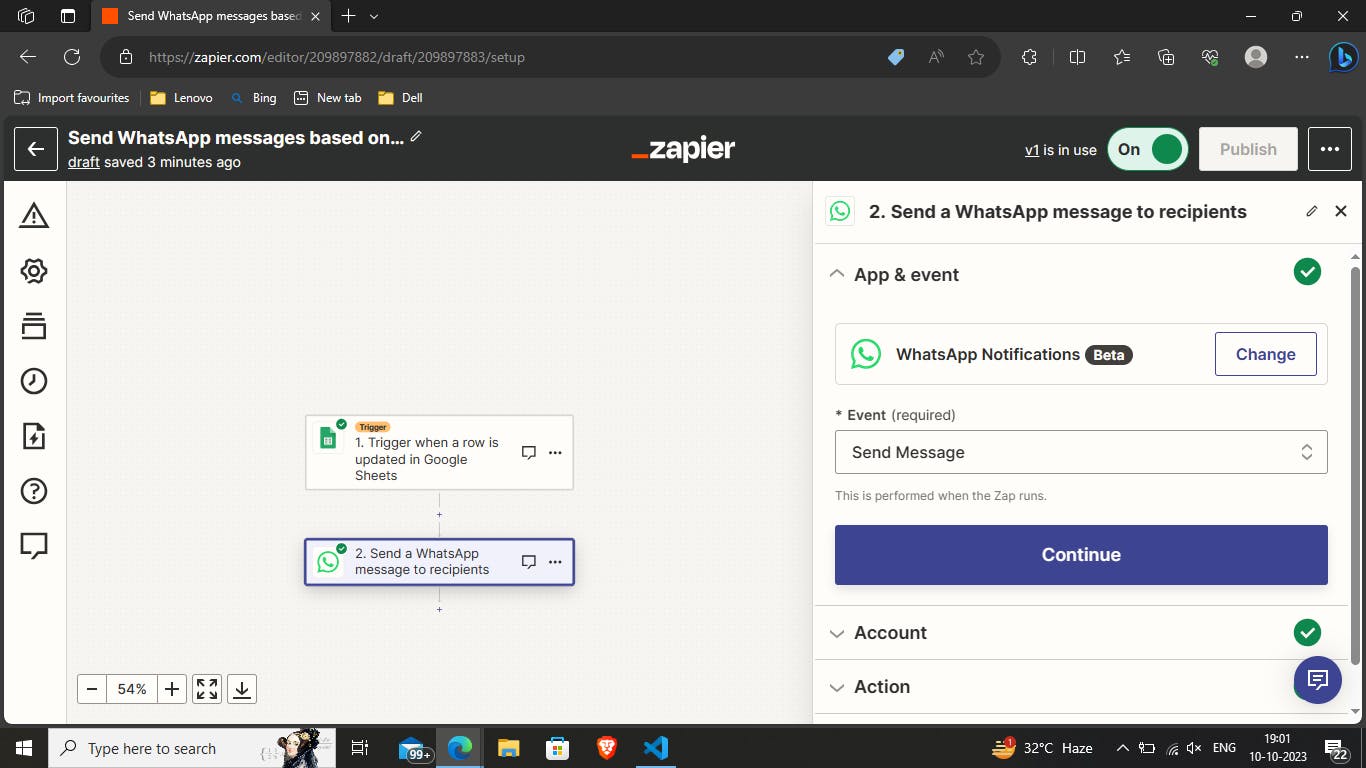
Set up the Trigger: The trigger is the event that starts your Zap. In this case, you want to start the Zap when there’s a new or updated row in your Google Sheets document. So, choose Google Sheets as your trigger app and select the “New Spreadsheet Row” or “Updated Spreadsheet Row” trigger event.
Connect Your Google Sheets Account: Follow the prompts to connect your Google Sheets account to Zapier and select the specific spreadsheet and worksheet you want to use.
Set up the Action: The action is what happens when your Zap is triggered. In this case, you want to send a WhatsApp message. So, choose the “Send Message” action event.
Connect Your Twilio Account: Follow the prompts to connect your WhatsApp account to Zapier.
Customize Your WhatsApp Message: In the “Send Message” action setup, you can customize your WhatsApp message. You can use data from the trigger step to personalize your message (e.g., use the recipient’s name from your Google Sheets document).
Test Your Zap: Finally, test your Zap to make sure it works as expected. If everything is set up correctly, a WhatsApp message will be sent whenever there’s an update in your Google Sheets document.
And that’s it! You’ve now automated the process of sending WhatsApp messages based on updates to a Google Sheets document using Zapier.